Amazon’s Sponsored Products has grown in popularity amongst sellers as a key product marketing tool. Sure, anyone can throw products into a campaign, let it run, and hope for the best when it comes to sales. However, you need to master the art of Amazon Sponsored Products campaign creation to be successful in the Amazon advertising space.
Not all Sponsored Product campaigns are created equal, and optimizing your campaign structure will make all the difference to improve your Amazon Marketing game plan.
Poorly constructed campaigns cause ACOS to spike and products to have negative conversion rates. Countless times we’ve seen sellers fail to realize their campaigns are set up in a way that is hurting rather than helping sales rank, and then it’s too late.
Think of the structure of a campaign as the foundation of a house; you need to have a sturdy frame before you can continue building. So let’s walk through the best practices to help ensure your framework is in place to build the most efficient and optimized campaigns possible.
Before Creating Your Campaigns
Before we dive into how to build our sturdy foundation for Sponsored Products, let’s take a step back. We first need to cover some of the essentials a campaign needs to run efficiently and effectively.
1. Decide which products you want to advertise, whether it be your entire portfolio or only product lines. Smaller sellers will be asking themselves different questions than larger sellers, just as resellers should be asking themselves different questions than brands. We commonly see sellers only advertising SKUs they think should convert well when there is no supporting evidence. If you choose to advertise only a portion of your catalogue, you could be missing out because of your unintentional product bias. Sponsored Products should be a core part of your marketing strategy for your entire catalogue. If you’re not advertising a product, you are missing out on the real estate your competitors are leveraging.
2. Regardless of the number of products you’re advertising, understand your business objectives for each individual product you are advertising. Grouping products with similar goals will allow you to have better control over performance. There are three different types of business objectives:
- Product launch: Gain exposure and drive traffic to new products
- Liquidate inventory: Target stale or aged inventory to untie capital
- Profitability: Drive incremental revenue for your best-selling products
3. Break down your products by category and business objective to drive the most relevant traffic to your listings. An easy way to develop your campaign structure is to imagine you are setting up a website’s navigation bar for these products. How would you categorize your SKUs on a website to ensure potential customers see the items most relevant to them? Focus on the big, overarching commonalities of your products, like brand, product line, or product type. For example, if you sell shoes, you could break your products down by boots, sneakers, and high heels. Then, break these categories down even further based on your business objectives – we like to call these Activity Based Campaigns. If you have different goals for different products within each category, it’s important to structure your campaigns around that. You may be willing to initially take a higher ACoS for a new line of boots you are launching to gain exposure and traction. On the other hand, you would also be trying to drive incremental revenue at a profitable rate for your best-selling boots, which is an entirely different strategy. Another popular campaign after the holiday season is centered around aged inventory. Separating these products out allows you to bid more aggressively and increase sales velocity for these stale products. This strategy has also proven successful for liquidating inventory a month before Long Term Storage Fees hit.
4. Within the campaigns themselves, we recommend that you split out ad groups by product-specific attributes. If you sell shoes, break up the ad groups by a more specific product attribute, such as style, material type, or audience. This will allow for greater keyword relevancy toward customer search terms. Grouping products that share common customer search terms allow for the addition of keywords that convert effectively for that particular group of products.
5. Configure for success by understanding how customers search for your product organically. If you currently have campaigns running but are looking to revamp them, then you have a big advantage. Use keyword data from the Search Term Report to discover how customers are finding your products. You may think that customers are searching for your products by color or size and find that they are actually searching by style or brand. If you are a shoe seller with no previous campaign data to reference, you’ll want to put yourself in the literal shoes of your customer. Having this insight will make the framework of your campaigns fall into place; using your own product knowledge and expertise in your market will also help sellers who do not have data from campaigns.
Now that you’ve divided up your portfolio by business objectives, category, product line/type, and search relevancy, we can get into the basic structure of all Sponsored Products campaigns. Putting in the time and effort to effectively map out your products beforehand allows you to easily navigate and designate products to campaigns and ad groups, and minimizes the possibility of having to reconfigure them in the future.
Choosing the Type of Campaign to Advertise Your Products Within Sponsored Products
There are two types of campaigns that you’ll come across when setting up your ads within Sponsored Products: automatic campaigns and manual campaigns.
The majority of Sponsored Products users usually have just one type of campaign running their ads. We’ve seen a lot of Amazon sellers group their products into one general automatic campaign, or one general manual campaign. These campaigns often experience very high Advertising Cost of Sales (ACoS) and a low amount of sales, because Amazon is pairing your products with irrelevant keywords. This is why it is critical to get campaign structure right the first time around. We recommend running both types simultaneously, since each have their own individual benefits and bidding strategies.
Automatic
Automatic campaigns are the most popular among Sponsored Product users because they require much less maintenance and usually maintain a “set it and forget it” mentality. First time Sponsored Product users tend to gravitate towards these campaigns because they’re unsure what keywords will work best for their ads. Automatic campaigns target ads to all relevant customer search terms as dictated by Amazon. Automatic campaigns only run properly if the listing’s title, bullet points, product description, and keywords are optimized. Amazon then selects keywords from these categories and “tests” them, providing keywords for your own campaign. Since Amazon automatically selects the keywords, bidding is defaulted to the ad group level, giving you very little control.
Manual
Manual campaigns provide allow for greater control as you have the opportunity to add new keywords, select keyword match types, and adjust bids accordingly. When keywords start producing a higher return on ad spend per click, their bids can be increased and vice versa. Sometimes manual campaigns can be costly to manage and maintain. When managed correctly, these campaigns can be the most effective advertising tool on Amazon’s platform.

Both
We often see the majority of Sponsored Products users running one type or the other, typically grouping all products into one general automatic campaign or one general manual campaign. This is not something we suggest doing because these campaigns often experience a very high Advertising Cost of Sales (ACoS) and a low number of sales because Amazon pairs your products with customer search terms that aren’t descriptive or irrelevant. This is why it is critical to get campaign structure established correctly the first time around.
We recommend running both campaign types simultaneously, reaping the benefits each one can offer as part of an “explore and exploit strategy.” Begin by creating an automatic campaign to cast a wide net and keep this campaign running at all times. Automatic campaigns generate high quality data over time. Once these campaigns begin generating orders, explore Seller Central’s Search Term Report to find previously unidentified keywords that efficiently converted into sales. This is the best source of keyword data because the actual text customers searched for on Amazon before clicking onto your advertisement is explicitly identified.
After identifying which the customer search terms performed well within your automatic campaign, create a manual counterpart that is identical in structure and naming convention. This is the easiest and most streamlined way to exploit high performing customer search terms and have greater control over the bid.
We never recommend turning off automatic campaigns after a certain amount of time. Because manual campaigns are structured for constant keyword modification, it’s important to maintain the opportunity to consistently add new keywords to your campaigns that convert well into sales. Consumers are searching for different things on Amazon every minute – who knows what may show up one day that you may miss if you take away that wide net.
Keywords
Keywords are one of the most important factors in the success of your Sponsored Products. Even though keywords are one of the main drivers in your campaign’s success, they’re only used in manual campaigns. Since they are housed in the ad group level, these are typically descriptive of the products within the ad groups. Keywords also have three different match types, which you’ll need to define each time you add a keyword. There are three different match types: broad, phrase, and exact. Manual campaigns can only run when there are keywords, so it is essential that you transfer over high performing customer search terms as keywords with refined match types to ensure you are competitive in the marketplace.

Mirrored Campaign Structure
The number of campaigns within Campaign Manager can add up quickly, especially when running automatic and manual campaigns simultaneously. With this in mind, creating a mirrored structure and naming convention at the campaign and ad group level will save you a lot of headache in the long run.
For example, say you are looking to create an automatic and manual campaign for women’s raincoats. When creating an automatic campaign, we recommend that you have the word “automatic” somewhere in the title and vice versa for the manual counterpart. We’ll name these campaigns Raincoats Automatic Campaign and Raincoats Manual Campaign as shown below.

When drilling down to these campaign’s ad groups, we’ll name each ad group by target audience. After determining how customers search for your products using the search term report, we will break down your products into separate ad groups by target audience. Avoid using generic ad group names like “Ad Group 1” because this will make it harder in the future to identify the products in each ad group. We will name the first ad group “men’s raincoats” to house only men’s raincoats. We recommend having the same products here as you would in your manual campaigns. This will ensure that you’ll be able to seamlessly add high performing search terms from your automatic campaign to your manual campaign.
Establishing Spend Parameters
Although budgets and bids may seem like a smaller component of Sponsored Products, it’s essential to the framework of your campaigns.
Setting a Budget
Amazon recently introduced a new and convenient payment method called “Unified Billing”, which allows sellers to deduct their advertising spend from sales proceeds. Previously sellers only had the option to have a credit card on file.
If you’re wondering: “How much should I be spending on Sponsored Products?” Don’t worry, you aren’t alone! We are asked this question countless times. Sponsored Products is a marketing tool, so your daily budget should be a number you are comfortable with that makes sense for the size of your portfolio, revenue and margins. For example, if you are advertising only 10 products, you most likely won’t need a $200 daily budget. Keep in mind that setting daily budgets does not guarantee that you will spend that much per day, but rather think of it as a max threshold for spend. We recommend starting low, but once you are at your efficiency target, do not let budgets constrain growth. You should always be analyzing average daily spend to reallocate budget based on campaign performance.
Account Level vs Campaign Level Budget
When setting a budget for your Sponsored Products Campaigns you’ll want to decide if you want to establish an account level budget or campaign level budgets. There are benefits to utilizing both, but each can work well in their own way. For sellers that have a tight budget for Sponsored Products, setting a daily budget on an account level is a great way to ensure that daily spend does not cross a specific threshold. However, when spend for the day reaches that max budget, all Sponsored Product ads stop running for the day which has the potential to constrain sales and growth. This is why we typically recommend setting a budget on the campaign level. When a campaign runs out of budget, only ads within that campaign will stop running for the day. Not to worry! All other campaigns are not affected by this campaign specific budget.
Setting Initial Default Bids
The default bid you set for both ad groups and keywords should be proportional to how much you are planning to spend. You should also take into account the competitiveness of your category. Categories like electronics, beauty, and supplements are extremely competitive, which means bids are typically a lot higher than most categories. We advise starting lower, just like daily budgets, and adjust over time to find the optimal bid for your product. For manual campaigns, you would want to look at each individual keyword rather than giving all keywords the same bid price. The best bid for keywords depends on your strategy. If you want to be on the first page, you will want to bid above Amazon’s “bid range”, which was previously “estimated page 1 bid.” This is a range that can vary drastically per keyword and match type, so take these suggestions with a grain of salt. Simply setting a high bid to on page 1 can hurt your conversion rate and sales rank in the long run if your product is not competitive. If you want to rank somewhere within the first five pages, your bidding price can be a lot lower. This bid range is an estimate and does not account for how your product converts at that particular bid. It’s definitely a great reference for setting initial bids, especially when first creating campaigns. If you aren’t sure what to set your initial default bids at, starting low and adjusting according to performance is an effective method for finding an optimal value. Over time you’ll want to adjust individual keyword and automatic ad group bids based on performance to best take advantage of how your products are converting.
Adding It All Up: Amazon Sponsored Products Campaign Creation
Now that you’ve learned about all the parts, let’s build campaigns!
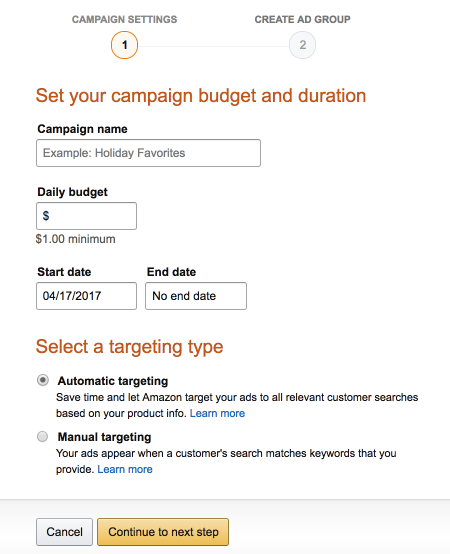
First, you’ll click into “Create Campaign” to get your automatic campaign kicked off and assign your first campaign name. This is just the initial setup, so naming can be altered down the road. After you’ve named your campaign, assign an initial budget to kick off your ads. When you get to setting a time frame for your campaigns to run, we recommend not setting a particular end date to avoid limiting growth on a campaign that could convert efficiently for a longer period of time. Instead, pause a specific campaign, ad group, or ad if you no longer want these running any longer.

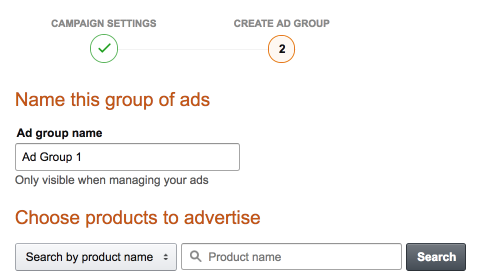
Now that you’ve completed the first step in creating a campaign, the next step is to start assigning products to ad groups. First, name your ad group based on what types of products you are adding. Remember, the naming convention is for you to easily navigate and find specific products. You’re able to search for ads by product name, SKU, or ASIN, and even bulk select products to add to your ad group.

Finally, establish a default bid for your ad group to run at. If you are creating a manual campaign, you’ll need to provide keywords, along with a default bid and match type. Amazon does provide suggested keywords based on your listing’s content, but we recommend using automatic keyword data from the Search Term report to mine out high converting search term to add as keywords as a more specific match type. This takes the guesswork out of what converts effectively for your products.
Advanced Strategies: Creating Campaigns In Bulk
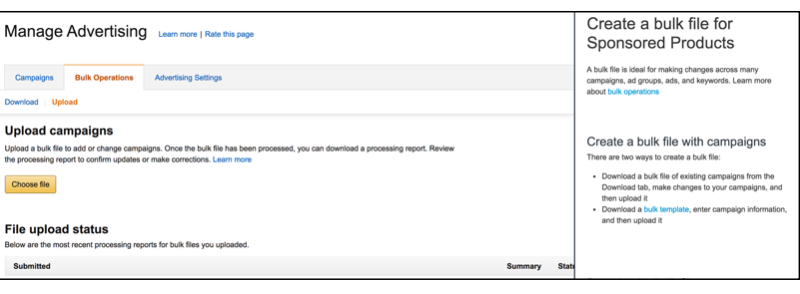
An efficient way to build your campaigns in bulk is by utilizing a bulk file upload. This is great for sellers that have a larger catalog to advertise. This template can be downloaded under Campaign Manager’s Bulk Operations tab. The template also includes a tab with required fields for creating campaigns, ad groups, ads, and keywords.

Key Takeaways
Setting Amazon Sponsored Products campaigns up properly the first time around will allow you to avoid any future headaches of redoing them in the future. Now that you’ve built a sturdy frame for your campaigns, there’s only one time left to do, let ‘em run (and manage them). Continuously optimizing your campaigns on a weekly basis will ensure that your products are receiving the right amount of visibility and are staying competitive.
Remember:
Advertise your entire product catalogue and evaluate SKUs based on objective data
Run both automatic and manual campaigns with mirrored campaign structure, using an explore & exploit strategy
Save time by using the Sponsored Products bulk upload file to create campaigns and execute bid strategies in bulk


